IT Helpdesk
IT Helpdesk
The contents of this page are created based on your current questions to the IT helpdesk.
Hot Topics:
- Online Courses: Help and support
- Microsoft Office: BSC offers FREE Microsoft Office for staff, faculty, and students
- Class Schedule: How do I find Open/Closed courses?
- Password Information: How do I change my password or verification information?
- TheSIS: How do I stop the cookie error?
- Wireless (Apogee): How do I get connected?
- BSC Mobile Printing: How do I access Mobile Printing?
Other Top IT Questions
Password Information:
Password Information regarding Active Directory (Email, etc.) passwords at BSC:
- The first time you attempt to access your email account, you will be asked to enter information that will be used later if you ever forget your password. If at a later time you need to go back and change the information that you entered, please click here.
- If you need to change your password, log into your email account (from the drop down menu under “myBSC” at the top of the BSC website) and then click on your name in the upper right corner and choose “My Account”. Then select “Security and Privacy”.
- If you have forgotten your password and need to reset it, please go to the Email login page (BSC website under myBSC) and select “Can’t access your account?” or, click here.
- Mandatory password changing will occur periodically.
- You may change it more often if you feel your password has been compromised.
- Passwords may be reused only after two prior changes.
Passwords must meet the following criteria
- Be between 7 and 20 characters in length
- Consist of at least 3 of the following 4 items Uppercase letters
- Lowercase letters
- Numbers
- Special characters i.e. !@#$%^&*
Reminder messages from the system to change your password will come several days before it expires.
Information Technology will NEVER ASK FOR YOUR LOGIN AND PASSWORD in an e-mail.
Colleague
-
Adjustments for the User Interface 4.4
An upgrade to the Colleague User Interface has been installed. Nothing will look different when viewing your screens, records, etc.
When you log in, you will probably see User Interface 4.4 displayed. The upgrade has installed version 4.5.
This is a known Internet Explorer issue. Basically, your browser is caching the old version, even though a newer one has been installed.
To correct the problem, please do the following:
Open Internet Explorer, and click the cogwheel in the upper-right hand section of the browser:

- Choose Internet Options, and make sure the "General" tab is selected.
- Click "Settings" under Browsing History.
- Under Check for newer versions of stored pages: click Every time I visit the webpage. Finally, click "OK" at the bottom.
- Reload the User Interface web page. Verify that the web page has "Colleague UI By Ellucian" on it and contains the link Click here to launch UI 4.5
If you are prompted to install the latest version of Silverlight, please do so. This will force a reload of the UI 4.5 login box and display the correct version. However, if you receive an error at this point, please email the BSC IT Helpdesk, [email protected], or call at extension 3033, option 2.
Remember, the link to the Colleague User Interface may be found by clicking on the "My BSC" link at the top of this page and choosing the "Colleague" link.
-
Faculty and Staff label download instruction
This document describes the steps necessary to transfer the Faculty/Staff label files from Colleague to your PC using UI.
Step 1.
Label File Creation in Colleague:
HR, XTRA, XPE1, XFSLSteps to Download the file to your PC
Step 2.
After logging into the system point to the task bar labeled "Options" and click the left mouse button. This will pull down the options task list. Point to "Import File" and click the left mouse button.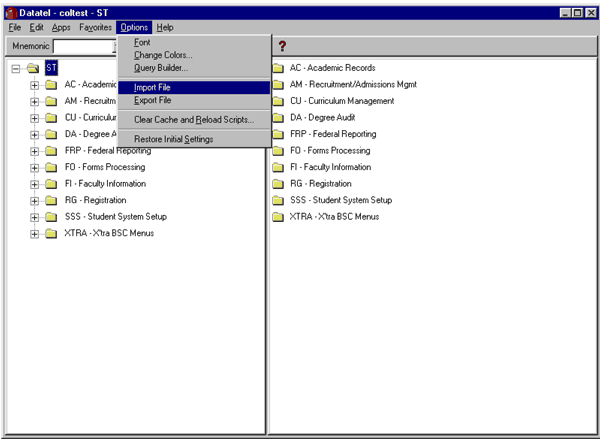
Step 3.
Populate the fields like the example below. The "Items:" field is your Faculty/Staff file name within Colleague and the "Local file:" is what you want to call it on your PC. You can save the screen below after you populate it. You might save it as filetransfer.wis and then use it each time you want to import a file down to your PC.Faculty/Staff Label file name legend:
FACSTF – Faculty/Staff, full and part time
FACULTYFP – Faculty, full and part time
FACULTYF – Faculty full time
FACULTYP – Faculty part time
STAFFFP – Staff full and part time
STAFFF – Staff full time
STAFFP – Staff part time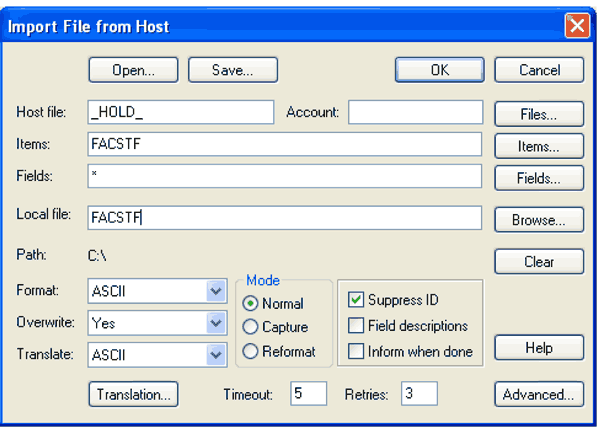
Step 4.
Click 'OK' to transfer the file and if everything transfers correctly the "Status:" should indicate the file transfer finished ok, click the "Exit" button to exit the screen. This will return you to the normal UI screen from which you began the process. Your file transfer is now complete.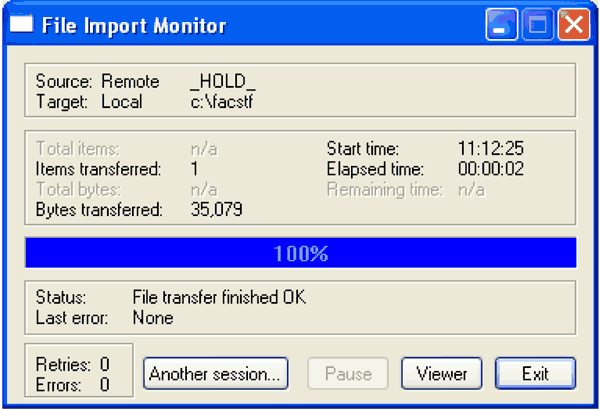
Step 5.
Instructions for creating your mail merge file and printing the labels.- Open MS Word, go to the Mailings, Start Mail Merge, Labels
- Under "Label vendors" choose Avery US Letter, click on 5162 in the "Product number" block and then press "OK"
- Now click: Select Recipients and then click on "Use existing list"
- Go to the appropriate drive, find your file and click "Open".
- Then click "Insert Merge Field" and insert each field one at a time to create the label format. NOTE: Make sure the cursor is in the top left of your document.
- Click on the "Update Labels" icon
- Click Preview Results and then Preview Results
- Click "Finish & Merge" and then "Print Document"
- On the "Merge to Printer" block make sure you check the "All" circle and then press "OK"
-
Important information about Colleague Web User Interface
Colleague's Web UI 4.3 (web user interface) currently only works with the Microsoft IE (internet explorer) browser.
Updates are expected later to allow Firefox and Chrome as optional browsers. Similarly MAC users of Safari will not be able to access Web UI 4.3 at this time.
Continue to the Colleague Site.
Emergency Text Messages:
-
How do I get campus emergency text messages?
Sign-up for Campus Emergency Text Messages
For EMPLOYEES
Login to your TheSIS Account
Select “Change Personal Information”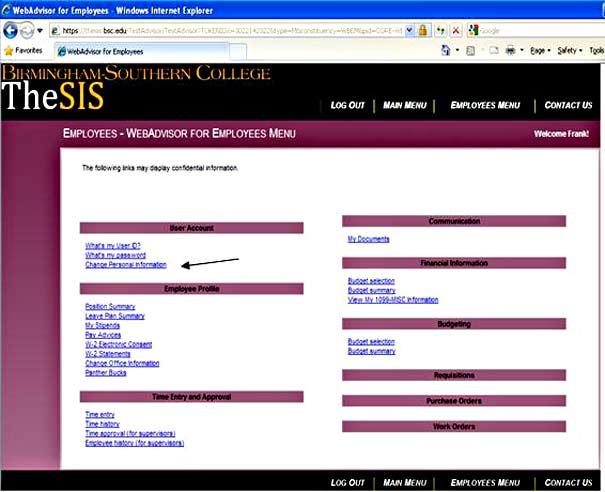
For STUDENTS and PARENTS
Login to your TheSIS Account
Select “Change Personal Information”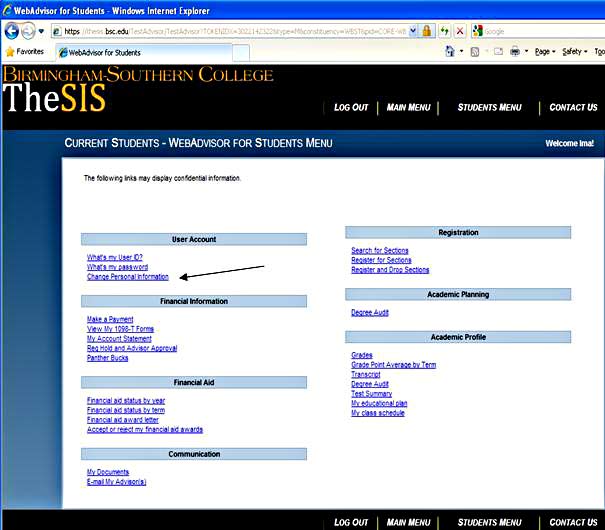
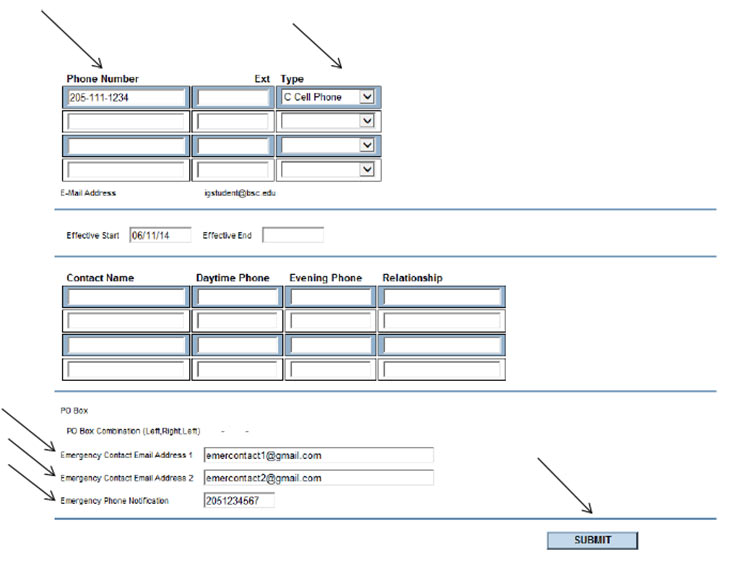
Next, fill-in your cell phone number with area code.
Select "Cell Phone" from the Type dropdown box.
Then, enter up to two "Emergency Contact Email" addresses along with one "Emergency Phone" number.
Click "Submit" to save your record.
Equipment Reservations:
-
Laptop/Projector/Screen Checkout
How do I check out a laptop/projector/screen?
The Library houses several laptops and projectors available for campus use. This equipment is reserved on a first-come, first-serve basis.
Contact Eric Kennedy in the Library via email or telephone at x4740 to reserve an item.
Labs:
-
All About Campus Computer Labs
Hours:
Olin 201, Olin 204 and the Norton Center Lab are open 24 hours. All other labs are open when their buildings are open.
Open access labs:
Humanities 118
Library (all three floors)
Norton Center Lab
Olin 204
Specialized use labs with some open access times:
Harbert 301
Humanities 118
Library
ARC
Olin 104
Olin 201
Stevens Science Center 240
Specialized use labs:
Harbert 126/Education Lab
Hill 41/Music Lab
Humanities 122/Language Lab
Humanities 102/Writing Center
Olin 103/ARC Tutoring
Annex 122/Art Lab
File saving in labs
When in labs, do not save your files on that local computer. Save to your flash drive or an online storage area. When a lab computer reboots or during a power outage, all extra files are automatically removed.
Miscellaneous:
- E-mail Etiquette Guideline
- Wireless (Apogee): How do I get connected?
- Residence Hall Connections:
- My Resnet Student Center
-
Mapping a Network Drive
Network
What if my data connection is not working?
Our department is responsible for campus network infrastructure and network services for faculty/staff/lab computers. We make sure that the data connections all over campus are active and ready for use by students, faculty and staff. For Resnet connections, please contact Apogee at x3033 (option 1) or 1-877-478-8861.
Mapping a Network Drive
How do I map a network drive?
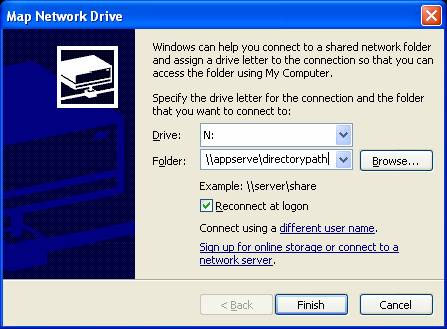
Use the following instructions to map a network drive:
- Right-click on the "My Computer" icon on your desktop and choose "Map Network Drive.."
- Choose a drive letter from the drop-down list that isn't already mapped(no path is listed beside the drive letter).
At this point, there are two alternatives to enter the network path.
You may simply type or paste the path name
(Example: \\appserve\directorypath) into the folder field (see above image) or continue with the following steps: - Choose "browse" and then select the desired network directory.
Example: To map to the "directorypath" directory on "appserve":
*after choosing "browse", go to "campus" in the list and select + to
expand "campus".
*then scroll thru the list to find "appserve".
*then choose the + to expand "appserve".
*then scroll thru the list until you find "directorypath".
*choose "ok" and then choose "finish".
A mapped drive to this directory will now be available by double-clicking the "My Computer" icon on your desktop. You will see the drive listed.
**Note: There is no "directorypath" directory. This is just an example of how to map to a drive.
Moodle:
-
Moodle Login Information for Students at BSC
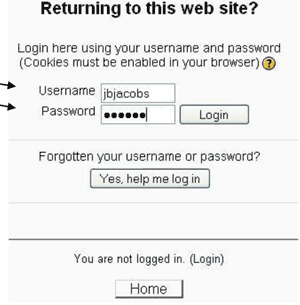 Go to http://moodle.bsc.edu
Type in your username
Type in your password
Click Login(info provided in letter from Admissions Department)
To update your password, click on the Password Change link under MyBSC at the top of this page.
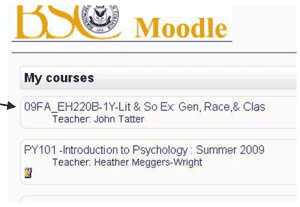 A list of the courses that you are enrolled in will appear. Click the name of the course to enter the course and find material.
If one of your courses isn't listed, one of the following may be true,
- The faculty member for that course has not made the course available yet or doesn't intend to use Moodle.
- You haven't officially enrolled in the course yet with our records dept.
- You just enrolled in the course today. Tonight after midnight you should be added to the course and it will appear in your listing by tomorrow morning.
Contact the helpdesk if you are sure none of these is the case.
 If you login and see this, one of these things may be true.
- None of the faculty for your courses has made their Moodle courses available yet.
- None of the faculty for your courses plan to use Moodle.
- You have not officially enrolled in any courses with the BSC records dept. Please contact the records dept to officially enroll.
Contact the helpdesk if you are sure none of these is the case.
Purchasing:
-
College Owned – How do I submit a Technology Proposal?
In order to more effectively plan for technology needs, both in the classroom and the office, the following form has been established for approving new technology proposals. Proposals of an academic nature will be forwarded to the Provost for review. If the proposal will affect more than one department (i.e. a new general purpose lab or classroom), or if a question of priority is raised it will be sent to the IT Faculty Advisory Committee to obtain input from all interested parties. Recommendations from the committee may then be incorporated into the proposal.
Examples of a technology proposal include but are not limited to:
- A new computer, piece of hardware, server, server-based software, server storage, backup equipment, or phone facility (lab or classroom) for the department
- New equipment or wiring for an existing lab or data/telecommunication facility
- Construction of new or relocation of existing facilities that require any type of data or telecommunication equipment. All new facilities will be required to include electrical and data connections.
- New campus services that require data or telecommunication services such as online registration or a campus card system or anything that may use these services.
- Software purchases (both for individual pcs or servers)
The IT department meets each Thursday at 2:00 (except on holidays and unforeseen circumstances). New tech proposals are discussed at that time. Please complete your form submission by noon on Wednesday to be considered in our Thursday meetings. You can expect initial communication by the Monday following your proposal submission. If it is necessary for IT to receive an attachment with this proposal, please use the "Choose File" field at the bottom of the form, or send an email with the file(s) to [email protected] and use BSC Technology Proposal for the subject line.
Note: All fields are required. If a question is not applicable to your request, please enter N/A.
Fill out this online form. -
Personal – Does the college offer a computer purchasing program?
Purchasing a Computer
Birmingham-Southern College, Apple, Dell, and Varsity Buys have teamed up to offer students, faculty and staff the ability to purchase computer systems for personal use at special prices with exclusive discounts and promotions. For more information, visit:
Telephone:
-
Faculty/Staff dialing information
Using Your Phone Service
Call Processing For Single-Line Phones
Transfer:
- While on a call, switchhook flash
- Hear special dialtone
- Dial the number
- Announce the caller in privacy
- Hang up
Call Forward:
To activate:
- Lift handset
- Dial *9
- Hear regular dial tone
- Dial number where calls are to be forwarded (include 9 prefix to dial out when necessary)
- Hang up
To Deactivate:
- Lift handset
- Dial #9
- Hear no dial tone- silence
- Hang up
Last Number Redial:
- Lift the handset
- Hear dial tone
- Dial #7
(The number is automatically dialed)
Three-Way Dialing:
- While on a call, switchhook flash
- Hear the special dial tone
- Dial the number
- Announce the conference
- Switchhook flash to connect the three callers
- Hang up when the conference is completed
Call Waiting:
- During a conversation hear two quick beeps
- To answer the other line, switchhook flash
- First call is put on hold, second call is connected
- Subsequent switchhook flashes alternate between the callers.
Faculty/Staff Dialing Information
MERIDIAN 1 ACCESS CODES FEATURE CODES: Call Pickup *7 Call Forward *9 Call Forward-Cancel #9 Permanent Hold *4 Last Number Redial #7 Park *3 Retrieve #3 Ring Again *6 Cancel #6 To Log on to Voice Mail Enter 3099 or press message key
After Prompt: enter extension #
After Prompt: enter password + #TO LISTEN TO MESSAGES: Enter 2 TO DELETE MESSAGES: Enter 76 TO RECORD GREETINGS: Press #2 After prompt: Press 1 for external greeting or 2 for internal greeting, press 5 After tone: Record greeting, then press # Press 2 to play recorded greetings TO SEND AN EXPRESS MESSAGE: Press 3098 After Prompt: Press number to receive message # After tone: Record message, hang up TO CHECK MESSAGES FROM OFF-CAMPUS Dial 226-3099, then follow LOG ON instructions TO LOG OFF: Enter 83 On-Campus Dialing
DIAL LAST 4 DIGITS OF NUMBERLocal Dialing:
9 + 7 DIGIT NUMBERYou will be charged for the following types of calls:
Long Distance:
9 + 1 + AREA CODE +7 DIGIT NUMBERInternational Calls:
9 + 011 + COUNTRY CODE + CITY CODE + LOCAL #
(PLEASE SEE THE BELLSOUTH WHITE PAGES FOR COUNTRY AND CITY CODE LISTINGS)Qwest Customer Service:
If problems dialing long distance, 1-800-860-8255
(24 hrs. a day)Non-Qwest Calling Card Calls:
9 + 0 = BellSouth Operator
9 + 00 = Qwest OperatorOther Common Carriers (OCC):
9 + 10XXX + 0 + AREA CODE + 7 DIGIT NUMBER
(PLEASE SEE THE BELLSOUTH WHITE PAGES)Contact your Carrier for information regarding their access numbers, surcharges, usage rates, billing information, and other available services.
-
Faculty/Staff Conference Phone Information
Birmingham Southern does not have internal capabilities to do conference calling. We have identified several vendors that members of our campus community use with great success. Please feel free to contact any of the parties below to assist you with your conference calling needs.
-
Faculty/Staff Voice Mail User Guide
Additional information about the BSC phone system is available above.
To Log On:
From your telephone:
Lift handset. Dial MMail Access Number or Press Message Key. Hear Mailbox Prompt. Press #. Hear Password Prompt. Enter your password and Press #.From other phones on campus:
Lift handset. Dial MMail Access Number or Press Message Key. Hear Mailbox Prompt. Enter your Mailbox Number and Press #. Hear Password Prompt. Enter Your Password and Press #.From off campus: 226-3099
Lift handset. Dial MMail Access Number. Hear Mailbox Prompt. Enter your mailbox number and Press #. Hear Password Prompt. Enter your password and Press #.To Retrieve Messages:
Play/Replay a Message:
After log on, hear message description. Press 2-Message is played. Hear "End of Message" prompt. Press 2. Hear "Start of Message" prompt-message is replayed. Press 2. to play a message you move forward or backward to.Delete/Restore a Message:
Press 76 to delete current message and advance to next message. To restore a deleted message before logging off MMail, reaccess the message and dial 76.To Change a Password:
After log-on, dial 84. Hear new password prompt. Enter new password and press #. Hear new password prompt. Enter new password and press #. Hear old password prompt. Enter old password and press #. Hear confirmation prompt.
To Record a Spoken Name:
After log-on, dial 89. Hear personal verification prompt. Press 5. Hear Tone. Record your name. Press # to finish. Hear personal verification prompt.
To Compose/Send Messages:
After log-on, dial 75. Hear mailbox prompt. Enter mailbox number to receive message and press #. (The same message may be sent to more than one mailbox. To delete/correct a just entered mailbox number, press 0#.) Press # a second time. Dial 5. Hear tone. Record message. Press # to finish. Dial 79 to send. Hear "Message Sent" prompt.
For Express Messaging:
Dial 3098. Hear mailbox prompt. Enter mailbox number to receive message and press #. Hear mailbox verification and prompt to record. Record message after the tone. Hang up when finished.
To Create:
External Greeting:
After log-on, dial 82. Hear external/internal greeting prompt. Dial 1. Dial 5. Hear tone. Record greeting. Press # to finish. Press 2 to play and review the greeting you recorded.Internal Greeting:
After log-on, dial 82. Hear external/internal greeting prompt. Dial 2. Dial 5. Hear tone. Record greeting. Press # to finish. Press 2 to play and review the greeting you recorded.Temporary Absence Greetings
After log-on, dial 82. Hear external/internal greeting prompt. Dial 1 for external greeting. Dial 2 for internal greeting. Dial 3 for temporary greeting. If you want to hear your current greeting, dial 2. Dial 5. Hear tone. Record greeting. Press # to finish. Press 2 to play and review the greeting you recorded. Setting the Expiry Date for Temporary Absence Greetings Dial 9. Enter the month, day and time, pressing # after each entry. For the current month or day, press # only. For the standard expiry time of 12:01 a.m. with any future date, press # for time. Pressing # # # sets "no expiry." To exit, dial 4.To Delete a Greeting:
After log-on, dial 82. Hear external/internal greeting prompt. Enter greeting number (1=external, 2=internal). Dial 76. Hear Delete Prompt.Voice Mail Hints:
* Press "0" at any time for help
* Press # to skip hearing a person's greeting and get record tone
* Keep mailbox cleaned out so caller can leave a message
* Use express message number 3098 to leave a message without ringing the telephone. (Like late at night.)
TheSIS:
-
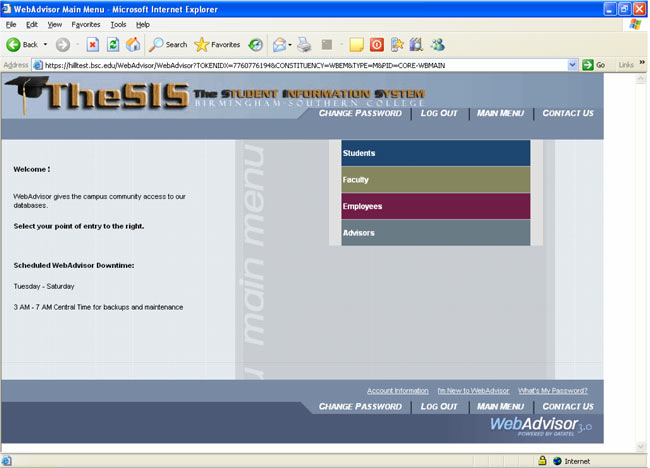
How can I access my TheSIS account?
You may access TheSIS by going to the header area of most BSC webpages and clicking MyBSC and choosing TheSIS from the dropdown choices.
NOTE: If you have tried too many times to log into TheSIS with an incorrect username or password, the system will lock you out for 10 minutes. If you try again during that 10-minute interval, the clock will be reset. You must wait 10 complete minutes.
-
MyBudget in TheSIS
Here is the screen displayed initially that allows you to select your perspective in TheSIS.
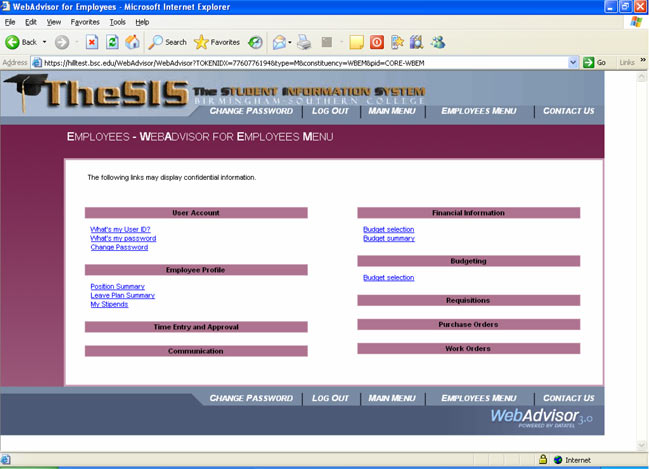
Employees
From this screen you'll notice 2 options under Financial Information.
- Budget selection allows you to specify the selection criteria for reporting.
- Budget summary displays the account information that you have available with the appropriate links to drill down into the details.
Notice all underlined words in the TheSIS menus represent links to which one can find more information. This is true the deeper you progress into the screens as well.
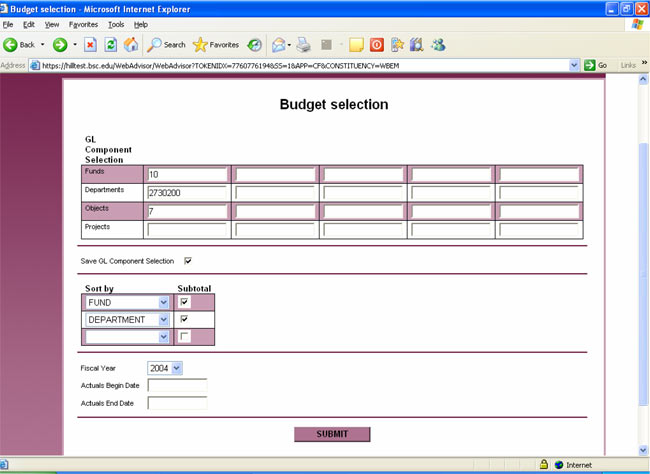
Budget Selection
The major points of interest on this screen are the Save GL Component Selection checkbox and the Fiscal Year drop down box.
- Save GL Component Selection allows one to enter the normal account subsets most often used so they may be retained. Once they are saved you only have to visit this screen to make changes. This will speed up the process during subsequent visits by allowing you to go directly to the Summary Screen, as it uses this information to locate the data presented.
- Fiscal Year is now in a drop down box, which allows for years other than the current open year to be viewed. While only one year at a time can be viewed it is extremely helpful to be able to view the past year, for example, during the time of transition into a new budget.
Notice in the example given that the Funds, Departments and Objects can all be specified. If you leave the object blank, all accounts for the department(s) selected will be returned. The Projects item is not utilized currently and may be ignored. Up to 5 different items in each category may be used and wildcard selecting is also possiblem, subject to the access security that one has been given. In this case the wildcard of 7 is used in the Objects item to only return accounts whose object code begins with a 7. Notice that no (…) ellipses are used here like in the GUI screens for wildcarding.
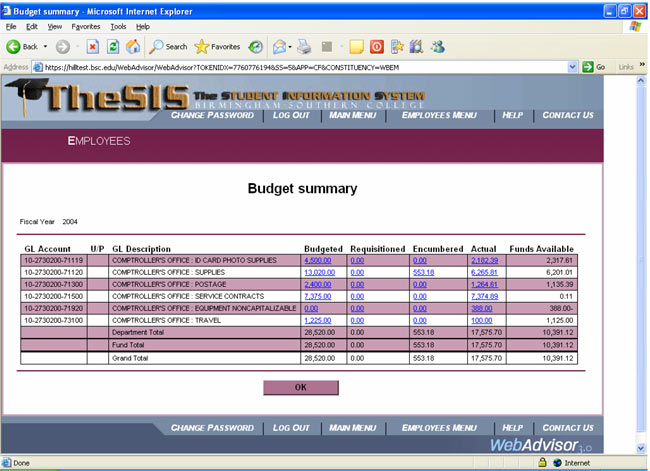
Budget Summary
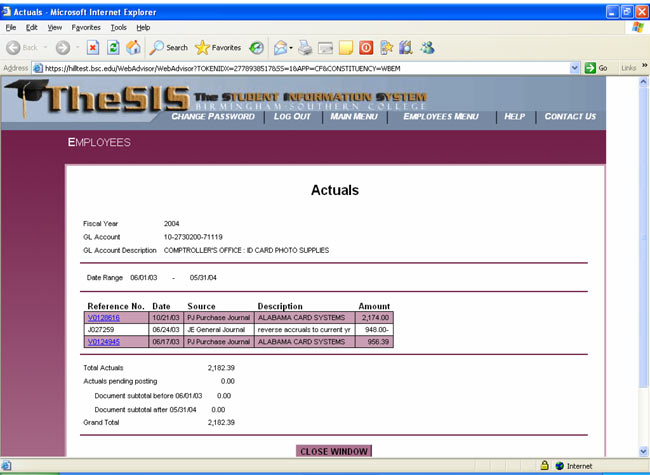
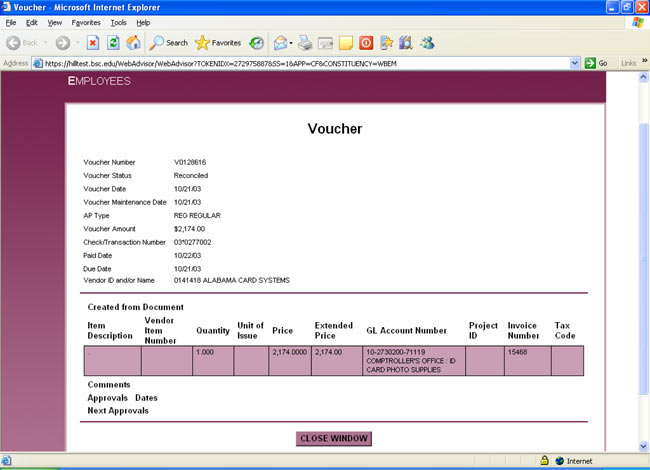
Here is where the added drill down capability begins to be apparent. Notice again on this screen as before where underlined items exist. They provide a link to find more details. By simply pointing to the underlined item and clicking the mouse, you can get more data. The Budgeted, Requisitioned, Encumbered and Actual columns all can be detailed into. A couple of examples follow on the next pages showing the level of detail. You will be able to see the purchase order and even down to the invoice level or as far back as the requisition.
Actuals
Voucher
Troubleshooting
As with all systems there are times when problems will occur and this one is no different. As you come across issues, please report them to the helpdesk at x3033 option 2 so we may address them.
Timekeeping:
- Employees – How do I log my work hours and vacation time?
- All other issues or questions please contact HR at 205-226-4646
Wireless:
-
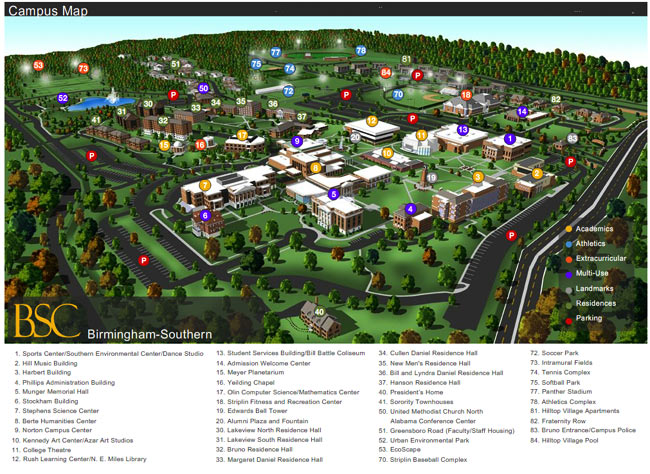
Wireless Locations
All residential buildings
SportsCenter/Southern Environmental Center (1)
Hill Music (2)
Harbert (3)
Stephens Science (7)
Berte Humanities (8)
Norton Campus Center (9)
Kennedy Art (10)
Theatre (11)
Library (12)
Bill Battle Coliseum (13)
Admissions Welcome Center (14)
Olin (17)
Bell Tower and Academic Quad (19)
Alumni Plaza and Fountain (20)
Urban Environmental Park (52)
Baseball Stadium (70)
Soccer Park (72)
Softball Stadium (75)
Panther Stadium (Football) (77)